- Downloaded
- 5.7 GB
- Uploaded
- 448.6 GB
- Ratio
- 78.11
- Seedbonus
- 134,973
- Upload Count
- 217 (223)
Member for 5 years
Timeline: Pick up work where you left off
This tool is located under the Task View button on the task bar. First, we will look at the timeline.
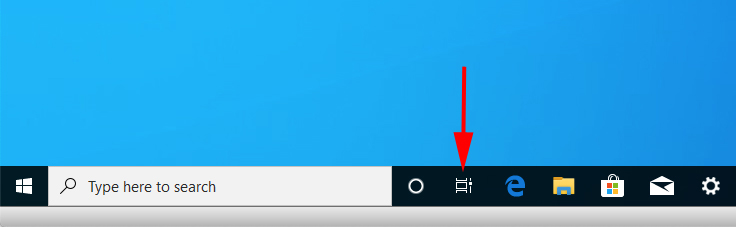
Click the Task View button to activate the Timeline feature.
Click the Task View button, and you’ll see Timeline: a series of thumbnails showing various things you’ve done on your PC recently, such as opening documents in applications and visiting websites. This extensive history is organized by date, starting with “Now” and moving back in time. You can scroll back through the thumbnails to find a document or image you were working on, or a web page you visited, and open it again.
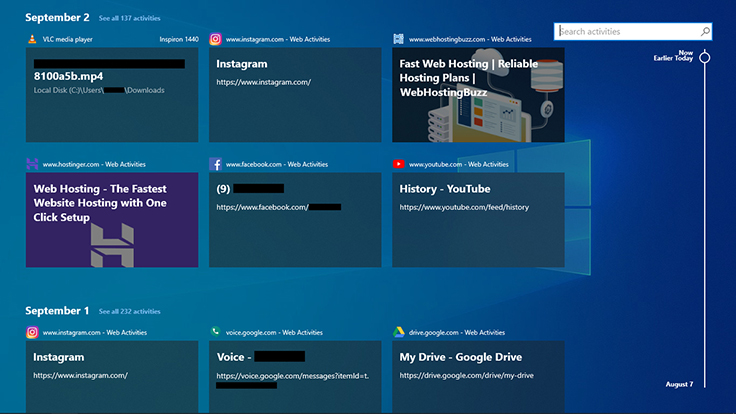
Browse through your Timeline to jump to a document you were working on or a web site you visited. (Click image to enlarge it.)
To access any item, just click its thumbnail, and it will load in the appropriate application or browser.
Note that by default, Timeline only shows websites you’ve visited in the Microsoft Edge browser. To get it to record your browsing history in Chrome, you have to install an official Microsoft extension for Chrome called Web Activities. (No word from Microsoft on whether a Timeline extension for Firefox is coming.) Similarly, Timeline doesn’t track activities from all your apps, but it does across the apps in Microsoft’s Office suite and more.
Timeline can show up to 30 days of activity history, but depending on how your settings are configured, you might see only 7 days’ worth of history; if so, there will be a “See more days in timeline” note near the top of the screen encouraging you to send Microsoft your activity history. If you click Yes, you’ll see 30 days of history. (We’ll cover this and other privacy settings in more detail in a moment.)
Only six thumbnails per day show in the main Timeline listing. To see all activities for a given day, click the small link next to the date heading that says, for example, See all 137 activities. There’s also a faster way to find items: Click the magnifying glass icon at the upper-right corner to search for an item in the Timeline by entering words that are contained in a document’s filename or title, or the name of a website. (Unfortunately, it can’t search the contents of documents or sites, only their names.)
Beyond recording activities on the Windows 10 device you’re currently using, Timeline also tracks your activity history across all devices that are signed in with the same Microsoft user account (if you’ve agreed to send Microsoft your activity history). For example, if you open a document in the Microsoft Word app on your iOS or Android phone, you’ll see that document listed in Timeline on your Windows 10 PC if both devices are signed in with the same Microsoft user account. And your Timeline is synced across all Windows 10 devices that are signed in with the same account.
Privacy settings: If you’re concerned about the way Timeline records your activity, you can turn off various aspects of it, as well as clear out its current history on a Windows 10 device: Launch the Settings app and click the Privacy icon. In the left column under “Windows permissions,” click Activity history. The main window displays the settings regarding your activity that you can turn off.
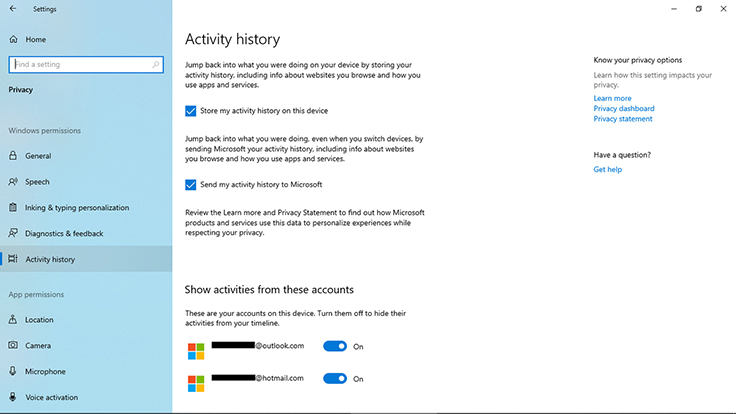
To turn off Timeline or otherwise control its tracking, head to Settings > Privacy > Activity history. (Click image to enlarge it.)
If you want to stop Windows 10 from tracking and recording your activities on the current device, uncheck the Store my activity history on this device box. Another setting, Send my activity history to Microsoft, allows your activity to be tracked on all devices signed into the same Microsoft account; it also lets you see the full 30 days of activity history on the main Timeline screen. Unchecking both of these boxes turns off activity tracking altogether.
Below those boxes, Microsoft lists the accounts being tracked through Timeline. Move the slider to Off for any Microsoft account you don’t want tracked. Finally, to clear the activity history for the primary account being tracked, click the Clear button below “Clear activity history.” To manage your Microsoft account privacy settings further, click the Manage my Microsoft account activity data link.
Using Timeline on an Android phone: You can access your Windows 10 Timeline on an Android phone by installing the Microsoft Launcher app on it. Sign into the app with your Microsoft user account and set Microsoft Launcher as your smartphone’s default home screen. Then from the home screen, swipe left to the first screen.
On the bottom toolbar, tap the Timeline icon. (If you don’t see it, you can enable Timeline in Microsoft Launcher Settings > Your feed.) A list of web pages you’ve recently visited on your Windows 10 devices appears. Tap a listing to open that web page in your phone’s web browser. If you have Office apps installed on your phone, you can also use Timeline to open recently used documents in those apps.
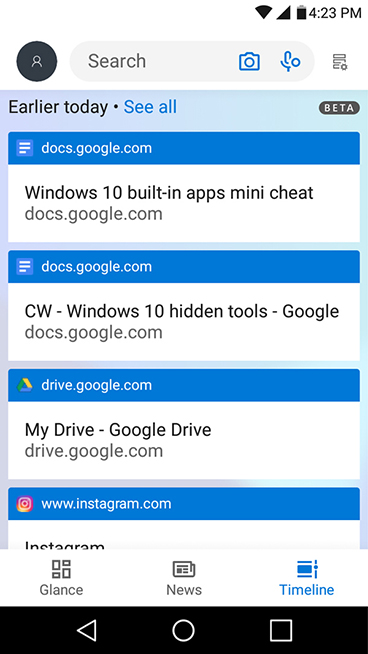
Timeline is available on Android devices via Microsoft’s Launcher app.
Note: As of this writing, the Timeline feature in the Microsoft Launcher is in beta. In our tests, the activity listing of the Timeline occasionally didn’t appear or didn’t update quickly.
This tool is located under the Task View button on the task bar. First, we will look at the timeline.
Click the Task View button to activate the Timeline feature.
Click the Task View button, and you’ll see Timeline: a series of thumbnails showing various things you’ve done on your PC recently, such as opening documents in applications and visiting websites. This extensive history is organized by date, starting with “Now” and moving back in time. You can scroll back through the thumbnails to find a document or image you were working on, or a web page you visited, and open it again.
Browse through your Timeline to jump to a document you were working on or a web site you visited. (Click image to enlarge it.)
To access any item, just click its thumbnail, and it will load in the appropriate application or browser.
Note that by default, Timeline only shows websites you’ve visited in the Microsoft Edge browser. To get it to record your browsing history in Chrome, you have to install an official Microsoft extension for Chrome called Web Activities. (No word from Microsoft on whether a Timeline extension for Firefox is coming.) Similarly, Timeline doesn’t track activities from all your apps, but it does across the apps in Microsoft’s Office suite and more.
Timeline can show up to 30 days of activity history, but depending on how your settings are configured, you might see only 7 days’ worth of history; if so, there will be a “See more days in timeline” note near the top of the screen encouraging you to send Microsoft your activity history. If you click Yes, you’ll see 30 days of history. (We’ll cover this and other privacy settings in more detail in a moment.)
Only six thumbnails per day show in the main Timeline listing. To see all activities for a given day, click the small link next to the date heading that says, for example, See all 137 activities. There’s also a faster way to find items: Click the magnifying glass icon at the upper-right corner to search for an item in the Timeline by entering words that are contained in a document’s filename or title, or the name of a website. (Unfortunately, it can’t search the contents of documents or sites, only their names.)
Beyond recording activities on the Windows 10 device you’re currently using, Timeline also tracks your activity history across all devices that are signed in with the same Microsoft user account (if you’ve agreed to send Microsoft your activity history). For example, if you open a document in the Microsoft Word app on your iOS or Android phone, you’ll see that document listed in Timeline on your Windows 10 PC if both devices are signed in with the same Microsoft user account. And your Timeline is synced across all Windows 10 devices that are signed in with the same account.
Privacy settings: If you’re concerned about the way Timeline records your activity, you can turn off various aspects of it, as well as clear out its current history on a Windows 10 device: Launch the Settings app and click the Privacy icon. In the left column under “Windows permissions,” click Activity history. The main window displays the settings regarding your activity that you can turn off.
To turn off Timeline or otherwise control its tracking, head to Settings > Privacy > Activity history. (Click image to enlarge it.)
If you want to stop Windows 10 from tracking and recording your activities on the current device, uncheck the Store my activity history on this device box. Another setting, Send my activity history to Microsoft, allows your activity to be tracked on all devices signed into the same Microsoft account; it also lets you see the full 30 days of activity history on the main Timeline screen. Unchecking both of these boxes turns off activity tracking altogether.
Below those boxes, Microsoft lists the accounts being tracked through Timeline. Move the slider to Off for any Microsoft account you don’t want tracked. Finally, to clear the activity history for the primary account being tracked, click the Clear button below “Clear activity history.” To manage your Microsoft account privacy settings further, click the Manage my Microsoft account activity data link.
Using Timeline on an Android phone: You can access your Windows 10 Timeline on an Android phone by installing the Microsoft Launcher app on it. Sign into the app with your Microsoft user account and set Microsoft Launcher as your smartphone’s default home screen. Then from the home screen, swipe left to the first screen.
On the bottom toolbar, tap the Timeline icon. (If you don’t see it, you can enable Timeline in Microsoft Launcher Settings > Your feed.) A list of web pages you’ve recently visited on your Windows 10 devices appears. Tap a listing to open that web page in your phone’s web browser. If you have Office apps installed on your phone, you can also use Timeline to open recently used documents in those apps.
Timeline is available on Android devices via Microsoft’s Launcher app.
Note: As of this writing, the Timeline feature in the Microsoft Launcher is in beta. In our tests, the activity listing of the Timeline occasionally didn’t appear or didn’t update quickly.