- Downloaded
- 118.2 GB
- Uploaded
- 42.7 TB
- Ratio
- 370.11
- Seedbonus
- 1,910,303
- Upload Count
- 0 (0)
Member for 9 years
Noboby asked for this but I found this taught me something. I hope it's useful,
If you ever purchased a Windows 11/10 PC from most popular brands like Dell, Lenovo, HP, Samsung, etc, chances are you might have noticed the manufacturer’s name and logo in the system section.
This OEM information includes information about a computer’s make and model, a custom logo, and support information that hides under the ‘System’ section of the Windows Control panel. The information is provided with the sole purpose of assisting users. You will not find it if you have a custom-built computer or have installed a clean copy of Windows.
If you wish, you can easily edit, add or change the OEM information by using a free tool or modifying the registry.
Edit or change System Information in Windows using free tools
You can change System Information in Windows 11/10 using free software like Ultimate Windows Tweaker, Windows Info Box Editable, and Windows OEM Info Editor.
1] Ultimate Windows Tweaker
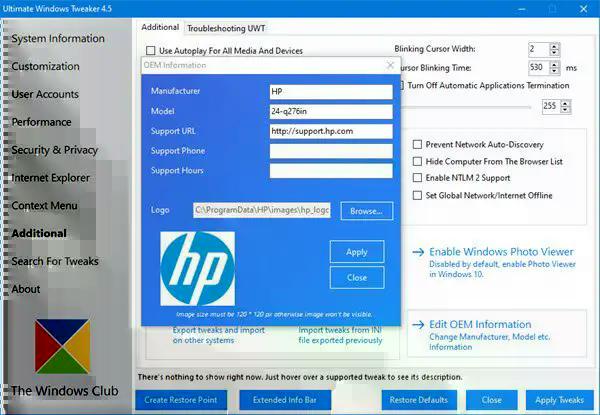
You can also use a freeware tool
You must be registered for see links
.You will see the setting under the Additional tweaks tab. Click on Edit OEM information to get started.
2] Windows Info Box Editable
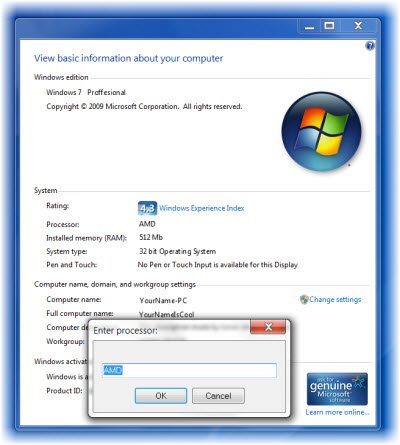
This free tool lets you change or edit the System Information easily.
Once you have downloaded this portable app, run its .exe file. To start editing the information, hit Enter.
In the box which opens, type the information you want to be changed. Click OK to change the next parameter.
This app lets you change Windows edition, processor name, RAM, System Type, Computer name, full computer name, full description, and Workgroup.
3] Windows OEM Info Editor
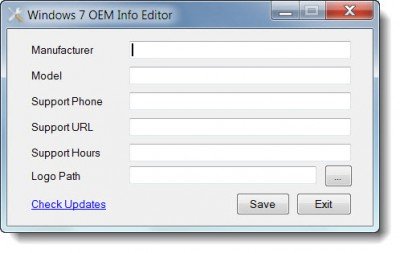
You can also
You must be registered for see links
Windows OEM Info Editor. It also allows you to change OEM information like Manufacturer, Model, etc.
Add or Change OEM Information using Registry in Windows 11/10
Open ‘Registry Editor’ and navigate to the following key –
HKEY_LOCAL_MACHINE\SOFTWARE\Microsoft\Windows\CurrentVersion\OEMInformation

If your PC is an OEM product it will bear the manufacturer name and support information. A number of strings will be seen listed with the following Value Names:
HKEY_LOCAL_MACHINE\SOFTWARE\Microsoft\Windows\CurrentVersion\OEMInformation
If your PC is an OEM product it will bear the manufacturer name and support information. A number of strings will be seen listed with the following Value Names:
- Logo
- Manufacturer
- Model
- SupportHours
- SupportPhone
- SupportURL
To add OEM information, select the kind of information you want to be listed in your Control Panel and begin creating values for each desired field, giving the value names mentioned above in the list.
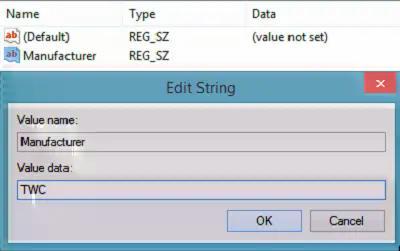
Select the OEM key (left), right-click in the right section of the window and select New > String Value. with value type REG_SZ and give it the name “Manufacturer”.

Next, double-click on the value to open the Edit String window and enter your custom information into the Value Data box.
Here, I want my PC’s custom manufacturer to be identified as The Windows Club or TWC. Press OK to save the value.
Next, open the Control Panel and see the ‘System’ section. You’ll see your new Manufacturer information listed there.
If you add other values, such as a support telephone number or website, they’ll appear in a separate “Support” section of the window.

One can even select a custom logo image. Do not keep the size however more than 150
Pixels. Also, save the image in BMP format for the best results.
Simply provide the “Logo” value to the path on your drive where the image is saved.
Select the OEM key (left), right-click in the right section of the window and select New > String Value. with value type REG_SZ and give it the name “Manufacturer”.
Next, double-click on the value to open the Edit String window and enter your custom information into the Value Data box.
Here, I want my PC’s custom manufacturer to be identified as The Windows Club or TWC. Press OK to save the value.
Next, open the Control Panel and see the ‘System’ section. You’ll see your new Manufacturer information listed there.
If you add other values, such as a support telephone number or website, they’ll appear in a separate “Support” section of the window.
One can even select a custom logo image. Do not keep the size however more than 150
Pixels. Also, save the image in BMP format for the best results.
Simply provide the “Logo” value to the path on your drive where the image is saved.
How do I change my OEM name in Windows?
To change the OEM information or name in Windows, you need to use the Registry Editor.
For that, open the Registry Editor and navigate to this path:
HKEY_LOCAL_MACHINE\SOFTWARE\Microsoft\Windows\CurrentVersion\OEMInformation.
Then, change the Manufacturer’s name and set it according to your requirements. Finally, you need to restart your computer.
For that, open the Registry Editor and navigate to this path:
HKEY_LOCAL_MACHINE\SOFTWARE\Microsoft\Windows\CurrentVersion\OEMInformation.
Then, change the Manufacturer’s name and set it according to your requirements. Finally, you need to restart your computer.
How do I change my OEM information in the registry?
To change your OEM information in the Windows Registry, you need to open this path:
HKEY_LOCAL_MACHINE\SOFTWARE\Microsoft\Windows\CurrentVersion\OEMInformation.
Here you can find several keys, including Logo, Manufacturer, Model, SupportHours, etc. You can choose one option at a time and change it as per your wish.
Well, that's all folks, If I messed up anything or copied something incorrectly
please let me know, It's how we all learn after all. Never be afraid to try something because you might fail
It's important to just start and learn from those failures, which I love to call, learning opportunities.
Hugs my Fam.