- Downloaded
- 774.5 GB
- Uploaded
- 7.8 TB
- Ratio
- 10.32
- Seedbonus
- 7
- Upload Count
- 0 (0)
Member for 5 years
Well then, you’ll be happy to know that there’s an easy fix that lets you change the drive letters assigned to disk partitions. Psyched? Let’s find out how you can change drive letters in Windows 10.
How To Change Drive Letters In Windows 10?
Note 1: Before proceeding, it’s important to note that you cannot assign a drive letter to multiple drives. This means that if the drive letter you want to assign to a particular drive is already associated with another drive, you’ll first need to dissociate it with that drive, before it can be assigned to the current drive.
Note 2: You shouldn’t try to change the drive letter associated with the system partition, or the partition where all of your programs are installed. That’s because changing the drive letter will cause the installed programs to stop working.
Changing drive letters in Windows 10 is hardly a problem and takes nothing more than a couple moments. Here’s how to get it done:
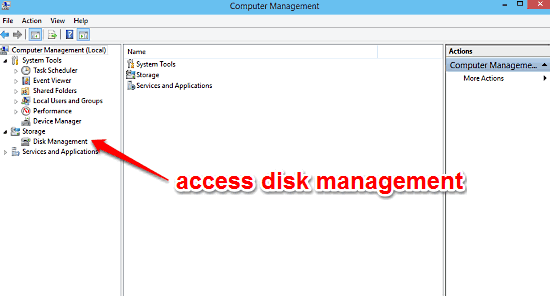
Step 1: Right click on This PC, and click on the Manage (requires administrator privileges) option to launch the Computer Management console.
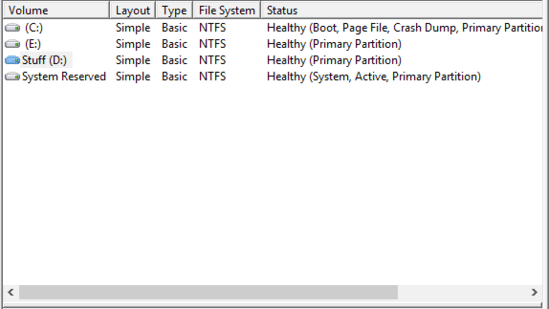
Step 2: The Computer Management console is an important system module, that lets you tinker with advanced options such as task scheduling and system services and applications management. Head to the left pane and click on Disk Management under Storage. Once you do that, a list of all the disk partitions will show up on the right, along with information such as File System, Operating Status etc. Right click on the disk partition whose drive letter you want to change, and select the Change Drive Letter and Paths option.

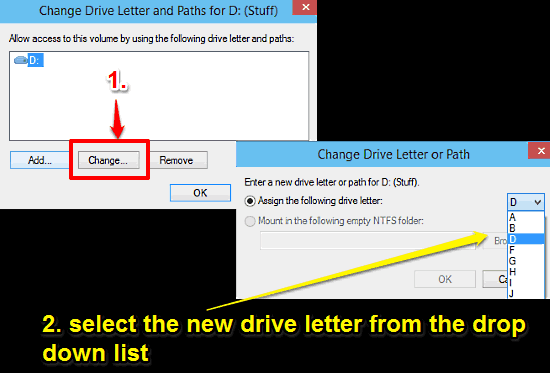
Step 3: A small window will now pop up, having buttons for adding/removing/changing the drive letter for the selected drive. Click the Change button (It’s not advisable to use the Add/Remove Options, as they can cause problems while accessing the partition), and another pop-up will appear. Against the Assign the following drive letter option, you’ll see a drop-down listing of all the available letters available for assignment. Select the one you want, and hit OK. If the warning prompt comes up, click OK on it as well and close the Computer Management console.
That’s it! You’ve just associated a new letter to a disk partition/drive.
How To Change Drive Letters In Windows 10?
Note 1: Before proceeding, it’s important to note that you cannot assign a drive letter to multiple drives. This means that if the drive letter you want to assign to a particular drive is already associated with another drive, you’ll first need to dissociate it with that drive, before it can be assigned to the current drive.
Note 2: You shouldn’t try to change the drive letter associated with the system partition, or the partition where all of your programs are installed. That’s because changing the drive letter will cause the installed programs to stop working.
Changing drive letters in Windows 10 is hardly a problem and takes nothing more than a couple moments. Here’s how to get it done:
Step 1: Right click on This PC, and click on the Manage (requires administrator privileges) option to launch the Computer Management console.
Step 2: The Computer Management console is an important system module, that lets you tinker with advanced options such as task scheduling and system services and applications management. Head to the left pane and click on Disk Management under Storage. Once you do that, a list of all the disk partitions will show up on the right, along with information such as File System, Operating Status etc. Right click on the disk partition whose drive letter you want to change, and select the Change Drive Letter and Paths option.
Step 3: A small window will now pop up, having buttons for adding/removing/changing the drive letter for the selected drive. Click the Change button (It’s not advisable to use the Add/Remove Options, as they can cause problems while accessing the partition), and another pop-up will appear. Against the Assign the following drive letter option, you’ll see a drop-down listing of all the available letters available for assignment. Select the one you want, and hit OK. If the warning prompt comes up, click OK on it as well and close the Computer Management console.
That’s it! You’ve just associated a new letter to a disk partition/drive.